
The Google Antigravity CLI (agy) runs Antigravity's coding agent in your terminal on macOS, Linux, Googlebook and Windows. You configure it with slash commands such as /config and /permissions or in ~/.gemini/antigravity-cli/settings.json. To allow all permissions without prompts, launch agy --dangerously-skip-permissions, set "toolPermission": "always-proceed", or add wildcard allow rules such as command(*).
Install and launch the Antigravity CLI (agy)
Install the Antigravity CLI (agy, v1.2+) with the installer for your operating system.
On macOS, Linux and Googlebook, run:
curl -fsSL https://antigravity.google/cli/install.sh | bashThe installer places the binary at ~/.local/bin/agy by default.
On Windows in PowerShell, run:
irm https://antigravity.google/cli/install.ps1 | iexOn Windows in Command Prompt (CMD), run:
curl -fsSL https://antigravity.google/cli/install.cmd -o install.cmd && install.cmd && del install.cmdBoth Windows installers place the binary at C:\Users\<username>\AppData\Local\agy\bin by default. Open a terminal and check the installation:
agy --versionThe first launch asks you to set up three things:
- Colour scheme: choose
Dark,Solarized Dark,Solarized Lightor your terminal default. - Rendering mode: choose
Alt-Screen modefor a full-screen buffer orInline modefor output in terminal history. - Workspace trust: confirm that you trust the repository directory before the agent begins file indexing.
Common CLI commands, startup flags and slash commands
Run agy in a project directory to start an interactive session. Flags change how it starts:
| Command or flag | Default | What it does |
|---|---|---|
agy | None | Launches the interactive TUI in the current directory |
agy -i "prompt", --prompt-interactive | None | Runs an initial prompt interactively and continues the session |
agy -p "prompt", --print, --prompt | None | Runs a single prompt non-interactively in headless mode and prints the response |
-c, --continue | false | Continues the most recent conversation |
--conversation | None | Resumes a previous conversation by ID |
--mode | "" | Sets the session execution mode: accept-edits, auto or plan |
--model | None | Selects the model for the current CLI session |
--effort | None | Sets the reasoning effort for the session, from low through max depending on the model |
--sandbox | false | Runs in a terminal sandbox with OS containment restrictions enabled |
--dangerously-skip-permissions | false | Auto-approves all tool permission requests without prompting |
--remote-control | false | Creates a Remote Control connection for the CLI session on startup |
/goal <objective> | None | Runs the task autonomously until verified complete, without intermediate pauses |
/grill-me [task] | None | Prompts the agent to interview you one question at a time before starting work |
/plan [task] | None | Explores the codebase, clarifies requirements and drafts a reviewable Implementation Plan |
/diff | None | Opens the interactive diff viewer to inspect changes, turns and commits |
/exit, /quit | None | Closes the TUI session and restores your host shell |
Configure the Antigravity CLI with /config and settings.json
The CLI keeps persistent preferences in ~/.gemini/antigravity-cli/settings.json, and any key you leave out uses its default.
{
  "agentMode": "accept-edits",
  "toolPermission": "strict",
  "notifications": true
}
How the settings file works:
- Schema validation: add
"$schema": "https://antigravity.google/schemas/v1/settings.json"at the top of the file for autocomplete and validation in editors such as VS Code. - Settings panel: run
/configor its alias/settingsto open the Settings Editor, change options with the arrow keys, and pressEscto close. - Account telemetry:
Enable Telemetryin/confighas nosettings.jsonkey because the CLI saves that choice with your account.
Other settings live in their own files:
- Keyboard shortcuts: run
/keybindingsto open the Keyboard Shortcut Editor and customise shortcuts in~/.gemini/antigravity-cli/keybindings.json. - Permissions manager: run
/permissionsto view, add, edit and deleteaction(target)rules acrossProject,SharedandGlobalscopes. - MCP and plugins: run
/mcpto open the Model Context Protocol server manager, or/pluginto manage plugins. - Script hooks: run
/hooksin the prompt box to browse active pre-flight and post-format script hooks.
Key settings.json options
| Option key | Type | System default | Options and behaviour |
|---|---|---|---|
agentMode | string | "" (default mode) | Startup execution mode: "", "accept-edits", "auto" or "plan" |
toolPermission | string | "request-review" | Global safety preset: "request-review", "proceed-in-sandbox", "always-proceed" or "strict" |
artifactReviewPolicy | string | "asks-for-review" | Whether the agent waits for review on an artifact: "asks-for-review", "agent-decides" or "always-proceed" |
enableTerminalSandbox | boolean | false | Restricts local execution commands launched by agents to OS containment rings |
allowNonWorkspaceAccess | boolean | false | Lets the agent read and edit files outside workspace folders, subject to your mode and permission rules |
notifications | boolean | false | Rings the terminal bell and shows a desktop notification for approvals, answers or finished turns |
altScreenMode | string | "default" | Screen buffer usage: "default", "always" or "never" ("never" is available only in settings.json) |
editorMode | string | "default" | Prompt editing model: "default" for flat text editing or "vim" for modal editing |
permissions | object | None | Holds allow, ask and deny rule lists for the agent's tools |
Execution modes and tool permissions
Two settings decide how often the agent stops to ask you: the execution mode and toolPermission. Deny rules still block an action in every mode.
Set the mode with agentMode in settings.json, for one session with --mode, or cycle modes with Shift + Tab:
default(leaveagentModeunset): asks you to review diffs before files change.accept-edits: approves workspace file edits and creations automatically.auto: approves workspace edits, runs commands in the terminal sandbox by default, and runs safe, reversible commands without prompting.autorequirements: requires CLI v1.3.5+ on macOS and Linux or v1.4.4+ on Windows, the terminal sandbox, and a personal account.plan: adds/planso the agent analyses the codebase and outlines a plan before editing.
toolPermission sets when the agent asks before running a tool:
request-review(default): asks before running write, bash, web or MCP tools.proceed-in-sandbox: runs terminal commands without asking when Sandbox Mode is on and the command runs inside the terminal sandbox.strict: asks before every tool action, including file reads, even if an allow rule matches, and takes precedence overautomode.always-proceed: runs commands, web requests and MCP tools without prompting unless anaskordenyrule matches, overridingautomode.
How to allow all permissions and commands in agy
There are several ways to skip manual confirmation:
- Skip all permission prompts for one session: launch
agy --dangerously-skip-permissionsto auto-approve all tool permission requests. - Set
always-proceed: set"toolPermission": "always-proceed"insettings.json, so commands, web requests and MCP tools run unless anaskordenyrule matches. - Also skip edit and artifact reviews: add
"agentMode": "accept-edits"and"artifactReviewPolicy": "always-proceed"tosettings.json:
{
  "agentMode": "accept-edits",
  "toolPermission": "always-proceed",
  "artifactReviewPolicy": "always-proceed"
}- Allow all commands with a wildcard rule: add
command(*)to theallowlist insettings.jsonor with/permissions, and keep it out ofaskanddeny. - Use
automode: launchagy --mode=autoor set"agentMode": "auto", so workspace edits and safe, reversible commands run without prompting. - Use
Turboin the Antigravity App: in the desktop app, chooseTurbounderSettings > General > Global Permissions > Permission Presetto disable the sandbox and allow all actions.
Permission rules: allow, ask and deny
Rules use the form action(target) in allow, ask and deny lists under permissions in settings.json. These lists live in your global settings file. Conflicts follow a strict order: Deny, then Ask, then Allow. So with command(*) in ask and command(git) in allow, every command still prompts.
| Action | Example targets | Default |
|---|---|---|
read_file | read_file(/path) or read_file(*) | Ask, but workspace files are allowed |
write_file | write_file(/path) or write_file(*) | Ask, but workspace files are allowed |
read_url | read_url(domain) or read_url(*) | Ask |
execute_url | execute_url(domain) or execute_url(*) | Ask |
command | command(prefix) or command(regex:pattern) | Ask |
unsandboxed | unsandboxed(prefix) or unsandboxed(*) | Ask (business and enterprise accounts only) |
mcp | mcp(server/tool) or mcp(server/*) | Ask |
How rules match:
- Global wildcards:
*matches every target for an action, such asread_file(*),command(*)ormcp(*). - Command prefixes and regex:
commandrules match word-by-word prefixes literally by default, or match regular expressions when the target starts withregex:. - Implied rules: allowing
write_fileon a path also allowsread_filethere, and denyingread_fileon a path also blockswrite_file. - Windows paths: drive letters such as
C:are removed and backslashes become forward slashes before rules are checked. - Windows command matching: in PowerShell or Command Prompt, commands that cannot be split cleanly into words need an exact match or a
regex:rule, such ascommand(regex:git .*). - Editing at the prompt: before confirming
Allowon a file, URL or MCP prompt card, you can edit the target string to widen its scope for the turn.
{
  "permissions": {
    "allow": [
      "command(git)",
      "command(regex:npm run (build|lint|test))",
      "read_file(/var/log/app)",
      "write_file(src/)",
      "read_url(google.com)",
      "mcp(linter/*)"
    ],
    "deny": [
      "command(rm -rf)",
      "command(regex:curl .*)",
      "command(sudo)",
      "write_file(.git/)",
      "write_file(/home/user/.ssh)"
    ],
    "ask": ["command(*)", "execute_url(aws.amazon.com)", "mcp(sql/execute_mutation)"]
  }
}
Manage rules interactively with /permissions
Type /permissions in the prompt box and press Enter to open the Permissions Manager panel:
- Scope picker: use the arrow keys or
JandKto chooseProject,SharedorGlobal, then pressEnter. - Rule viewer: switch between the
allowlist,denylistandasklisttabs with the left and right arrow keys orTab. - Add a rule: press
A, type a rule inaction(target)format such ascommand(git), and pressEnterto validate and save it. - Edit or delete a rule: highlight a rule and press
EorCtrl + Gto edit it, or pressDorBackspaceto delete it.
Notifications, tool confirmations and keybindings
The notifications setting is off by default. Turn it on and the CLI rings the terminal bell and shows a desktop notification when the agent needs approval or an answer, or finishes its turn.
In default mode, the CLI pauses before it changes files or runs commands. These keys answer its prompts:
| Key or shortcut | TUI command | What it does |
|---|---|---|
y / n | confirm.yes / confirm.no | Authorises (y) or rejects (n) the proposed tool, command or active artifact |
1 / 2 | Not listed | Accepts (1) or rejects (2) a pending file edit or new file creation in default mode |
f | Not listed | Opens a full-screen, scrollable diff review with three context lines |
Ctrl+R, then A | view.review_artifact | Opens the Artifact Review panel (Ctrl+R), where A approves all generated artifacts in one action |
Shift+Tab | cli.cycle_mode | Cycles execution modes and auto-approves pending workspace edits when switching to accept-edits or auto |
For managing background subagents with /agents, jumping to and approving waiting subagents with Alt+J and Ctrl+K, and running multi-agent teams with /teamwork, see Google Antigravity multi-agent: run parallel coding agents.
If you also use the standalone editor, see Google Antigravity IDE: editor, agents and permissions for how it shares global hooks and sets up Strict mode, terminal sandboxing and artifact reviews.
To connect databases, documentation and external APIs with /mcp or mcp_config.json, see Google Antigravity MCP servers: set up and manage tools.
To install the CLI in PowerShell or Command Prompt, set your Windows PATH and enable the AppContainer sandbox, see Google Antigravity on Windows: install, CLI and setup.
Watch Antigravity sessions on a keypad or phone with Orbtile
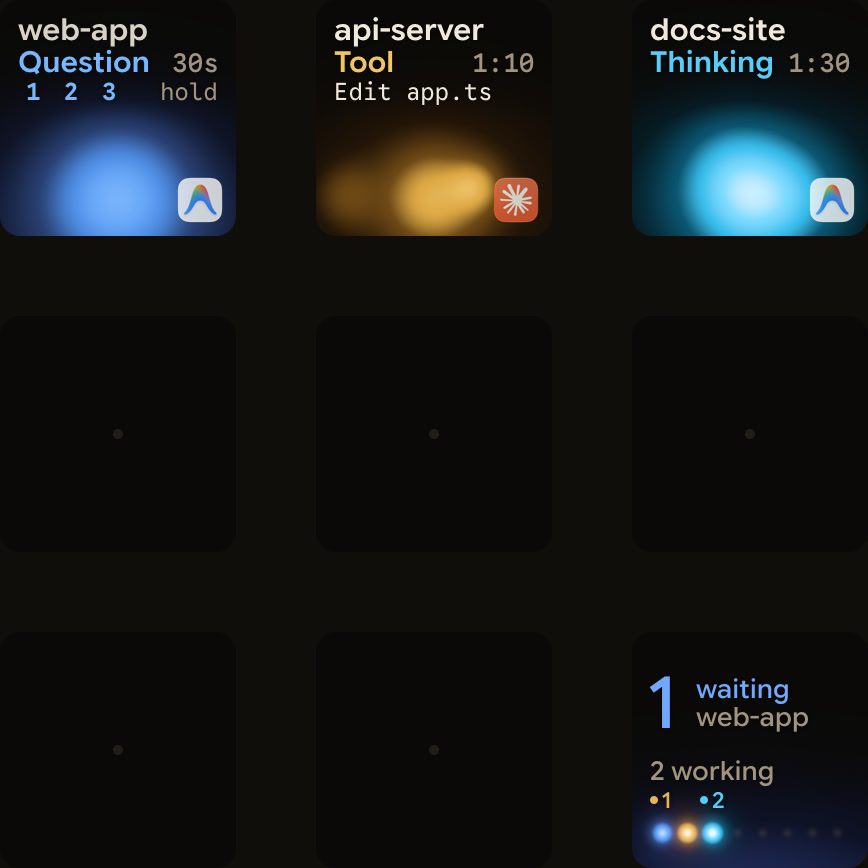
Orbtile shows your coding agents on a Logitech MX Creative Keypad, or on an iPhone (iOS 17+) or Android phone (Android 8.0+) running Orbtile Mobile. It runs on a computer with macOS 14.0 Sonoma or later on Apple silicon, or Windows 11 (x64).
- Antigravity desktop app: Orbtile follows conversations in the Antigravity desktop app and gives each one a key with its title, state and live reply text.
- Waiting questions first: a conversation waiting on a question moves to the front and, from Orbtile 0.3.4, uses the shared terracotta alarm colour.
- Answer on the keys: you can answer up to four numbered-option questions, with two to four choices each, from the keypad.
- Kept on your computer: permission prompts and written answers stay on your computer.
- Antigravity CLI and IDE: CLI and IDE sessions do not appear automatically, but a CLI hook script can report each session to Orbtile's local Adapter API.
- Enable the Adapter API: in Orbtile, open Settings > Agents, choose Build your own, turn on Let your own tools show sessions, and allow your adapter.
- Every agent on one pad: the same keypad or phone also shows Claude Code, Codex, ZCode and Kimi Code sessions, plus remote sessions over SSH.
See Know when Google Antigravity is waiting for you and Show any script or agent on a keypad with the Orbtile Adapter API.
FAQ
How do I allow all permissions or commands in the Antigravity CLI?
Launch agy with the --dangerously-skip-permissions flag to auto-approve all tool permission requests for a session. Or set toolPermission to always-proceed in settings.json. You can also add a wildcard command rule to your allow list with /permissions, if no ask or deny rule matches.
How does the Antigravity CLI handle conflicting permission rules?
Rules use the action(target) format in deny, ask and allow lists. When rules conflict, Deny wins over Ask, and Ask wins over Allow.
How do I turn on notifications in the Antigravity CLI?
Open /config and turn on Notifications, or set notifications to true in settings.json. The CLI then rings the terminal bell and shows a desktop notification when the agent needs approval or an answer, or finishes its turn.
Does Orbtile show Google Antigravity CLI sessions?
Not automatically. Orbtile follows the Antigravity desktop app, and CLI and IDE sessions don't appear. A hook script can send CLI session updates to Orbtile's local Adapter API, so each session shows on a Logitech MX Creative Keypad, an iPhone or an Android phone.